
Painting over existing render looks like a simple job. It rarely is. The number of exterior paint failures on rendered homes that come down to inadequate preparation is significant — and most of those failures were completely preventable.
Here’s what actually needs to happen when you’re painting over existing render in Sydney, whether it’s a first-time exterior repaint or a re-do over previous paintwork.
Step One: Assess the Render Condition Honestly
Before anything else, you need to know what you’re actually working with. Not all render is in a condition that allows painting over the top without additional work first.
Key things to check:
- Tap the surface lightly — hollow sections produce a dull thud instead of a sharp knock. Hollow render has lost adhesion to the substrate
- Look for hairline cracks, wider movement cracks, and any cracking following window or door reveals
- Check for heavy chalking — rub the surface and see how much powder comes away
- Look for biological growth — moss, lichen, or mould on south-facing or shaded surfaces
- Check for efflorescence — white crystalline deposits that indicate moisture movement through the render
Hollow sections must be cut out and re-rendered. Active movement cracks need the underlying cause assessed before any repair. Painting over either of these without remediation guarantees short-lived results. Our house rendering services handle full re-renders and patch repairs before the painting phase begins.
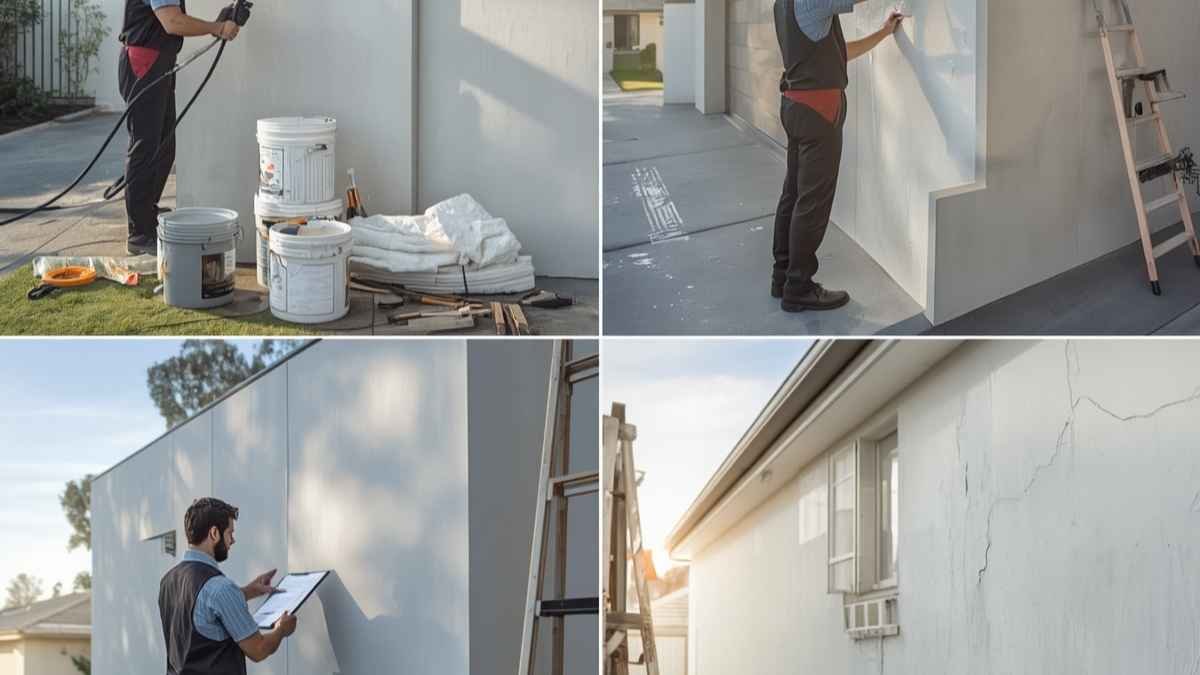
Step Two: High-Pressure Wash
Every rendered exterior surface gets a thorough pressure wash before any preparation begins. This removes:
- Surface chalk from degraded paint or weathered render
- Accumulated dirt, dust, and pollution deposits
- Surface biological growth — moss, algae, and visible mould
- Salt deposits, particularly relevant in South-West Sydney’s proximity to the coast
- Loose paint fragments from any failing sections
The surface must be completely dry before further preparation — at least 24 hours in typical Sydney conditions, longer during humid periods. Applying primer or paint over a surface that’s even slightly damp is a reliable way to create adhesion problems.
Step Three: Treat Any Biological Growth
If moss, lichen, algae, or mould is present after pressure washing, a biocide treatment is required. A biocide is applied to all affected surfaces, allowed to dwell (typically 30 to 60 minutes depending on the product), and then washed off. In persistent cases a second treatment is applied.
This step is skipped more often than it should be. Biological growth on rendered surfaces has sub-surface structures that a pressure wash doesn’t reach. Without a biocide treatment, the growth returns through the new paint film within months — sometimes within a single wet season.
Step Four: Repair All Cracks and Surface Damage
Once the surface is clean and fully dry, every crack and area of damage is assessed and repaired:
- Hairline cracks in the paint film — sand back and fill with flexible acrylic filler, feather smooth
- Cracks in the render itself (up to 3mm) — cut out slightly, fill with compatible flexible render filler or acrylic caulk
- Wider structural cracks (3mm+) — cut out, back with the appropriate material, re-render with compatible product
- Hollow sections — cut out completely and re-render. There is no shortcut for hollow render
- Failed caulk at window and door reveals — remove all old caulk and replace with new flexible sealant
Step Five: Apply the Correct Primer
Primer is not optional on render — it’s what makes the topcoat bond properly to the surface. The right primer depends on the specific situation:
- Bare render (never painted): sealer primer to control absorption and prevent the topcoat from being soaked in unevenly
- Heavily chalking surface: bonding primer to restore adhesion before any topcoat
- Previously painted, sound surface: acrylic primer over repaired areas, full primer coat if the existing paint is in poor condition
- Patched or re-rendered sections: seal before priming to ensure consistent absorption
Using the wrong primer — or skipping it entirely because the existing paint ‘looks fine’ — is a fast way to end up with a topcoat that fails within 18 months. At Icon Touch, primer selection is a deliberate technical decision on every job, not a shortcut we skip when the schedule is tight.
Step Six: Apply Quality Topcoats
With the surface properly prepared and primed, the topcoat application is the final step. For rendered surfaces, the key requirements are:
- Flexibility: render moves with temperature cycles. An elastomeric or flexible exterior paint accommodates this movement without cracking
- Breathability: rendered masonry is a naturally breathing surface. A non-breathable paint film traps moisture and causes blistering from below
- Film build: two full coats applied at the manufacturer’s recommended spreading rate — not thinned out or over-extended
Important: New Render Has Different Timing Requirements
If you’re painting over newly applied render, there’s a non-negotiable timing requirement. Cement render needs a full 28-day cure before painting. Painting too early traps moisture inside the render and causes paint failure from below.
New render also has a high pH level that affects paint adhesion — a fact often overlooked when homeowners are eager to get to the finished colour. Either test the pH level with test strips or simply respect the full 28-day cure period. There’s no shortcut worth taking here.
Why This Requires a Professional
Painting over render isn’t technically difficult, but it requires experience to identify hidden issues — hollow sections, underlying moisture, wrong primer for the specific surface — that will cause problems later. A painter who cuts corners on preparation will give you a result that looks fine on day one and starts peeling within two years.
Icon Touch offers exterior painting services on rendered homes across Bankstown and South-West Sydney that follow every step of this process. Our house rendering services also cover new render application when existing render is beyond repair.
Not sure whether your render can simply be repainted or needs repair first? Contact us today for a free assessment — we’ll give you an honest answer and a clear quote.
[ Get a Free Render Assessment — Contact Icon Touch, Bankstown ]
